
Guidelines
You don’t have to be a professional to create amazing photos; all you need is to understand a couple of guidelines when capturing your memories. There are a variety of guidelines but in this blog post I will cover the top three which happen to be the rule of thirds, leading lines and depth of field. I will show a professional image, discuss the guideline they used then I will go over an image that I personally took.
Rule of Thirds

Matheus Bertelli beautifully captured the love in this relationship between the young girl and her dog in this image. Bertelli started photography as a hobby back in 2012 but it wasn’t long before his passion for it grew which led him to become a professional photographer that same year. He has spent and continues to spend his time studying YouTube videos, magazines, books and participating in conversations with fellow photographers in his area. You can see the above image as well as more of his work on StockSnap.
You can use the above link to access the image or go to this website address: https://stocksnap.io/photo/MACK2DTW5J

One of the guidelines Bertelli utilized in this image is the rule of thirds. To use this particular guideline you divide the image into nine equal sections and try to place the focus point on one of the lines or within the area where the lines cross; the viewer’s eye is drawn towards the cross-sections more so than the other areas. You can see that the pain focus point was placed on the dog’s nose as it sits almost perfectly in the cross-section. Bertelli then places the girl’s face in the upper middle section placing the linen on the knee closest to him. Thus, within this image, the main focal point would be on the girl’s pet dog rather than the girl indicating its importance to her.


In my image, I too utilized the rule of thirds that Bertelli used. You can see how I aligned the dog’s nose on the cross-section; however, I opted to put it on the lower cross-section rather than the upper one. Both images draw the eye to the child’s pet then back to the child which brings a sense of balance and interest to each of them.
Leading Lines

Jonas Svidras has dabbled in photography since his childhood but it wasn’t until he obtained his DSLR that he took it seriously. However, he utilizes photography as more of an outlet rather than his main source of income; his day job is that of an IT technician. You can see the above image as well as more of his work on StockSnap.
You can use the above link to access the image or go to this website address: https://stocksnap.io/photo/LXBEITMWN1

The guideline utilized by Svidras in this image is leading lines. Take note of how the lines in the brick lead to the main subject, the man, in the photograph. Leading lines come in a variety of shapes but they all help to draw the eyes of the viewer throughout the image and onto the main focus.


As you can see I copied the technique Svidras utilized. I did this by placing my subject in front of bricks and used their lines to draw the viewers eye towards him. Your subject does not always need to be a person; rather you could utilize a landscape image and use the road to lead the viewer’s eye throughout your image.
Depth of Field

Brodie Vissers gains his inspiration for photography through exploring as he travels. He enjoys being around different cultures and taking photographs of the things people are passionate about. Vissers spends his time taking lifestyle photographs as well as works on storytelling projects and creating images for specialty coffees. You can see the above image as well as more of his work on Burst.
You can use the above link to access the image or go to this website address: https://burst.shopify.com/@thenomadbrodie

Vissers utilized the depth of field guideline within this photograph. He accomplished this by keeping his main subject in crisp focus while letting the background behind the subject become blurred. By blurring out the background distractions the viewer’s eye will automatically fall onto the main subject that is in focus.

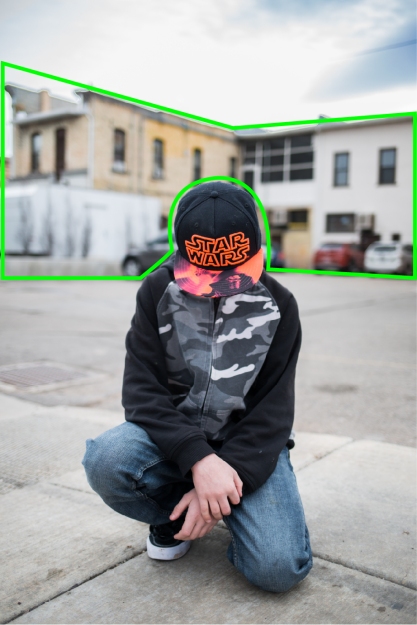
Unfortunately, I do not live near the beach but I was able to find a place where I could blur out the background and leave my main subject in focus. By letting the cars and buildings blur together I am able to bring out the details of my main subject which will bring the viewer’s eyes to the place I choose for them to focus on, just as Vissers had in his image.
Summary
Capturing amazing images is as easy as one, two and three. One: Remember to line your main focal point on the imaginary lines which represent the rule of thirds. Two: Don’t forget to use the lines in your image to direct the viewer’s eye to your main subject. Third: If you want to have your subject stand out against a noisy background make sure to keep it in focus while blurring out the background behind it. Good luck to you on your photography journey.
